In the realm of Android development, Jetpack Compose has revolutionized how we build UIs by offering a more declarative approach. However, creating visually appealing UIs is just one part of the equation. Ensuring that users can seamlessly navigate through your app is equally crucial, especially as apps grow in complexity. This article provides a detailed technical exploration of advanced navigation techniques in Jetpack Compose, focusing on best practices for managing NavController and optimizing your navigation architecture.
Understanding NavController in Jetpack Compose
The NavController is the cornerstone of navigation in Jetpack Compose. It handles the navigation graph, manages the back stack, and facilitates the transition between screens. But as your app’s architecture becomes more complex, with multiple layers of navigation, understanding how to manage NavController effectively becomes essential.
Basic Structure: Setting Up NavHost and NavController
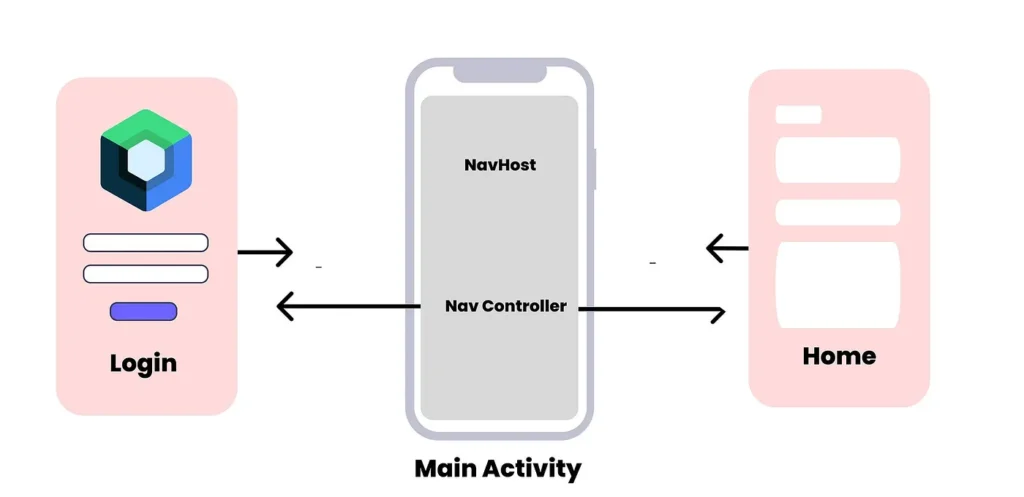
At its core, Jetpack Compose uses NavHost to define the navigation graph. This component is responsible for determining which composables should be displayed based on the current state of the NavController. Here’s how to set up a basic navigation structure:
val navController = rememberNavController()
NavHost(navController, startDestination = "home") {
    composable("home") { HomeScreen(navController) }
    composable("details/{itemId}") { backStackEntry ->
        DetailsScreen(navController, backStackEntry.arguments?.getString("itemId"))
    }
}
In this example, the NavHost contains two composable destinations: HomeScreen and DetailsScreen. The NavController facilitates navigation between these screens, leveraging arguments passed through the navigation graph.
Advanced Techniques for Managing Navigation
As your application scales, so does the complexity of its navigation requirements. Here are some advanced techniques to help manage this complexity:
Nested Navigation: Managing Complex Flows
Nested navigation allows for modular and maintainable navigation flows within your app. By nesting navigation graphs, you can isolate different sections of your app, making each part independently manageable:
NavHost(navController, startDestination = "main") {
    navigation(startDestination = "home", route = "main") {
        composable("home") { HomeScreen(navController) }
        composable("profile") { ProfileScreen(navController) }
    }
    composable("settings") { SettingsScreen(navController) }
}
In this example, the main route contains its own navigation graph, encapsulating the home and profile screens. This modular approach simplifies complex navigation flows, allowing for easier updates and maintenance.
Deep Linking: Handling External Navigation

Deep linking is critical for apps that need to handle external navigation events, such as opening a specific screen from a notification or a web link. Jetpack Compose’s NavController supports deep linking directly in the navigation graph:
NavHost(navController, startDestination = "home") {
    composable(
        "profile/{userId}",
        arguments = listOf(navArgument("userId") { type = NavType.StringType }),
        deepLinks = listOf(navDeepLink { uriPattern = "myapp://profile/{userId}" })
    ) { backStackEntry ->
        ProfileScreen(backStackEntry.arguments?.getString("userId"))
    }
}
This setup allows the app to handle deep links such as myapp://profile/1234, seamlessly navigating to the corresponding screen and passing the necessary parameters.
Dependency Injection with NavController: Enhancing Scalability and Testability
Managing NavController through CompositionLocal can be convenient for small projects, but as your app grows, it’s better to adopt a more scalable solution. Dependency injection, particularly with Hilt, allows for cleaner architecture and easier testing:
@AndroidEntryPoint
class MainActivity : ComponentActivity() {
    @Inject lateinit var navController: NavController

    override fun onCreate(savedInstanceState: Bundle?) {
        super.onCreate(savedInstanceState)
        setContent {
            MyApp {
                NavHost(navController = navController, startDestination = "home") {
                    composable("home") { HomeScreen(navController) }
                    composable("details/{itemId}") { DetailsScreen(navController, itemId) }
                }
            }
        }
    }
}
By injecting NavController into your composables, you gain more control over its lifecycle and reduce the likelihood of memory leaks. Additionally, this approach makes your navigation logic easier to test by decoupling it from the UI.
Optimizing Navigation Performance
Managing navigation effectively also involves performance considerations. Here are some tips to ensure your navigation flows are both responsive and efficient:
- Use launchSingleTop: When navigating to a destination that’s already on the back stack, use the launchSingleTop flag to avoid creating multiple instances of the same screen.
navController.navigate("profile/{userId}") {
    launchSingleTop = true
}
- Leverage saveState and restoreState: For complex navigation flows, maintaining the state of composables is crucial. Use saveState and restoreState in your navigation options to preserve the UI state during navigation:
navController.navigate("profile") {
    popUpTo(navController.graph.findStartDestination().id) {
        saveState = true
    }
    restoreState = true
}
These techniques help to optimize memory usage and improve the user experience by minimizing unnecessary recompositions.
Conclusion
Advanced navigation in Jetpack Compose offers a powerful toolkit for managing complex app flows. Whether you’re dealing with nested navigation graphs, implementing deep linking, or enhancing scalability with dependency injection, the techniques covered in this article will help you build more robust and maintainable Android applications. As Jetpack Compose continues to evolve, mastering these advanced concepts will be key to staying ahead in Android development.