Notifications are a powerful way to enhance user engagement in your Android app. By sending updates, reminders, and alerts directly to users’ devices, you can maintain active user interaction. In this guide, you’ll learn how to set up Firebase Cloud Messaging (FCM) and then create fully customizable Android notifications, including sound, images, icons, and more.
Setting Up Firebase Cloud Messaging (FCM)
Before implementing notifications in your app, you need to set up FCM. Follow the steps below to integrate Firebase into your Android app.
Prerequisites
- Your device or emulator must be running Android 4.4 (API level 19) or higher with Google Play Services.
- You must have access to a Firebase project on the Firebase Console.
Step 1: Create and Connect Firebase Project
- Go to the Firebase Console.
- Create a new Firebase project or choose an existing one.
- Click Add App and select Android.
- Register your app by providing its package name.
- Download the google-services.json file and add it to the
appdirectory of your Android project.
Step 2: Add Firebase SDK Dependencies
Add the following dependencies in your app-level build.gradle file:
dependencies {
    // Firebase BOM (Bill of Materials) for version management
    implementation platform('com.google.firebase:firebase-bom:31.1.0')

    // Firebase Cloud Messaging
    implementation 'com.google.firebase:firebase-messaging-ktx'

    // Optional: Firebase Analytics for better notification delivery reporting
    implementation 'com.google.firebase:firebase-analytics-ktx'
}
Step 3: Update AndroidManifest.xml
Update your AndroidManifest.xml file with necessary permissions and services:
<!-- Required Permissions -->
<uses-permission android:name="android.permission.INTERNET" />
<uses-permission android:name="android.permission.RECEIVE_BOOT_COMPLETED" />

<application
    ... >

    <!-- Firebase Messaging Service Declaration -->
    <service
        android:name=".MyFirebaseMessagingService"
        android:exported="false">
        <intent-filter>
            <action android:name="com.google.firebase.MESSAGING_EVENT" />
        </intent-filter>
    </service>

    <!-- Default notification icon and color -->
    <meta-data
        android:name="com.google.firebase.messaging.default_notification_icon"
        android:resource="@drawable/ic_stat_ic_notification" />
    <meta-data
        android:name="com.google.firebase.messaging.default_notification_color"
        android:resource="@color/colorAccent" />

    <!-- Notification channel for Android 8.0+ -->
    <meta-data
        android:name="com.google.firebase.messaging.default_notification_channel_id"
        android:value="@string/default_notification_channel_id" />
</application>
The service that extends FirebaseMessagingService is required for handling notifications when the app is in the background. You can set a default icon, color, and notification channel to control how notifications appear.
Step 4: Request Notification Permissions (Android 13+)
On Android 13+ (API level 33), apps must request runtime permission to show notifications. Add the following permission handling code to your activity:
// Declare a permission launcher
private val requestPermissionLauncher = registerForActivityResult(
    ActivityResultContracts.RequestPermission()
) { isGranted: Boolean ->
    if (isGranted) {
        // Notifications can be posted
    } else {
        // Notify the user about lack of notification permissions
    }
}

private fun askNotificationPermission() {
    // Only necessary for Android 13+
    if (Build.VERSION.SDK_INT >= Build.VERSION_CODES.TIRAMISU) {
        if (ContextCompat.checkSelfPermission(this, Manifest.permission.POST_NOTIFICATIONS) ==
            PackageManager.PERMISSION_GRANTED
        ) {
            // Notifications can be posted
        } else if (shouldShowRequestPermissionRationale(Manifest.permission.POST_NOTIFICATIONS)) {
            // Show educational UI and request permission
        } else {
            // Directly ask for permission
            requestPermissionLauncher.launch(Manifest.permission.POST_NOTIFICATIONS)
        }
    }
}
Accessing the FCM Device Token
The FCM SDK generates a unique registration token for the app instance. To send targeted messages, you need to access this token:
FirebaseMessaging.getInstance().token.addOnCompleteListener { task ->
    if (!task.isSuccessful) {
        Log.w(TAG, "Fetching FCM registration token failed", task.exception)
        return@addOnCompleteListener
    }

    // Get the FCM token
    val token = task.result
    Log.d(TAG, "FCM token: $token")
}
You can override onNewToken() in FirebaseMessagingService to handle token updates.
Building Custom Notifications in Android
Setting Up NotificationManager
To handle the creation and display of notifications, use NotificationManager. Notifications can be customized with different sounds, icons, images, and actions.
Step 1: Add Dependencies
Ensure you have the required Android dependencies in your build.gradle file:
dependencies {
    implementation 'androidx.core:core-ktx:1.8.0'
    implementation 'androidx.appcompat:appcompat:1.5.0'
}
Step 2: Create NotificationHelper Class
We’ll create a NotificationHelper class to handle building and displaying the notification. This class includes methods for setting the notification’s title, message, sound, icons, and images.
import android.app.NotificationManager
import android.app.PendingIntent
import android.content.Context
import android.content.Intent
import android.graphics.Bitmap
import android.graphics.BitmapFactory
import android.media.AudioAttributes
import android.net.Uri
import android.os.Build
import androidx.core.app.NotificationCompat
import kotlinx.coroutines.Dispatchers
import kotlinx.coroutines.withContext
import java.io.IOException
import java.net.URL

class NotificationHelper(private val context: Context) {

    companion object {
        const val CHANNEL_ID = "custom_notification_channel"
        const val NOTIFICATION_ID = 1001
    }

    // Function to build and display the notification
    suspend fun showNotification(
        title: String,
        message: String,
        iconUrl: String?,
        largeImageUrl: String?,
        soundUri: Uri?,
        pendingIntent: PendingIntent
    ) {
        val notificationManager = context.getSystemService(Context.NOTIFICATION_SERVICE) as NotificationManager

        // Load images asynchronously
        val smallIconBitmap = loadBitmapFromUrl(iconUrl)
        val largeImageBitmap = loadBitmapFromUrl(largeImageUrl)

        val notificationBuilder = NotificationCompat.Builder(context, CHANNEL_ID)
            .setContentTitle(title)
            .setContentText(message)
            .setSmallIcon(R.drawable.ic_notification_icon) // Replace with your drawable resource
            .setContentIntent(pendingIntent)
            .setAutoCancel(true)
            .setPriority(NotificationCompat.PRIORITY_HIGH)

        // Set sound if provided
        soundUri?.let {
            notificationBuilder.setSound(it)
        }

        // Set large icon
        smallIconBitmap?.let {
            notificationBuilder.setLargeIcon(it)
        }

        // Set big picture style if large image is provided
        largeImageBitmap?.let {
            notificationBuilder.setStyle(NotificationCompat.BigPictureStyle().bigPicture(it))
        }

        notificationManager.notify(NOTIFICATION_ID, notificationBuilder.build())
    }

    // Function to create a PendingIntent for notification click action
    fun createPendingIntent(destinationActivity: Class<*>): PendingIntent {
        val intent = Intent(context, destinationActivity).apply {
            flags = Intent.FLAG_ACTIVITY_NEW_TASK or Intent.FLAG_ACTIVITY_CLEAR_TASK
        }
        return PendingIntent.getActivity(context, 0, intent, PendingIntent.FLAG_UPDATE_CURRENT)
    }

    // Function to load Bitmap from URL
    private suspend fun loadBitmapFromUrl(url: String?): Bitmap? {
        return url?.let {
            try {
                withContext(Dispatchers.IO) {
                    val inputStream = URL(it).openStream()
                    BitmapFactory.decodeStream(inputStream)
                }
            } catch (e: IOException) {
                e.printStackTrace()
                null
            }
        }
    }
}
Step 3: Setting Up Notification Sound
If you want to use a custom sound for your notification, save your sound file (e.g., custom_notification_sound.mp3) in the res/raw directory of your Android project. Then, get the sound URI like so:
val soundUri: Uri = Uri.parse("android.resource://${context.packageName}/${R.raw.custom_notification_sound}")
This soundUri can be passed to the showNotification() function to play a custom sound when the notification is displayed.
Step 4: Using NotificationHelper to Display a Notification
You can use the NotificationHelper class to display a notification with a title, message, icon, large image, and sound. Here is how you can do that:
import kotlinx.coroutines.GlobalScope
import kotlinx.coroutines.launch

fun showCustomNotification(context: Context) {
    val notificationHelper = NotificationHelper(context)

    // Create a pending intent to open MainActivity when the notification is clicked
    val pendingIntent = notificationHelper.createPendingIntent(MainActivity::class.java)

    // Set the title, message, icon URL, large image URL, and sound URI for the notification
    val title = "New Offer!"
    val message = "Check out the latest deals and offers."
    val iconUrl = "https://example.com/icon.png" // Replace with actual URL
    val largeImageUrl = "https://example.com/large-image.png" // Replace with actual URL
    val soundUri = Uri.parse("android.resource://${context.packageName}/${R.raw.custom_notification_sound}")

    // Show the notification using a coroutine
    GlobalScope.launch {
        notificationHelper.showNotification(
            title = title,
            message = message,
            iconUrl = iconUrl,
            largeImageUrl = largeImageUrl,
            soundUri = soundUri,
            pendingIntent = pendingIntent
        )
    }
}
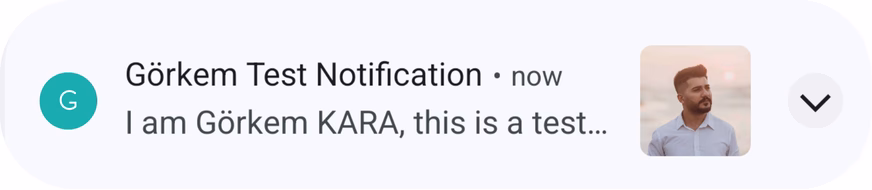
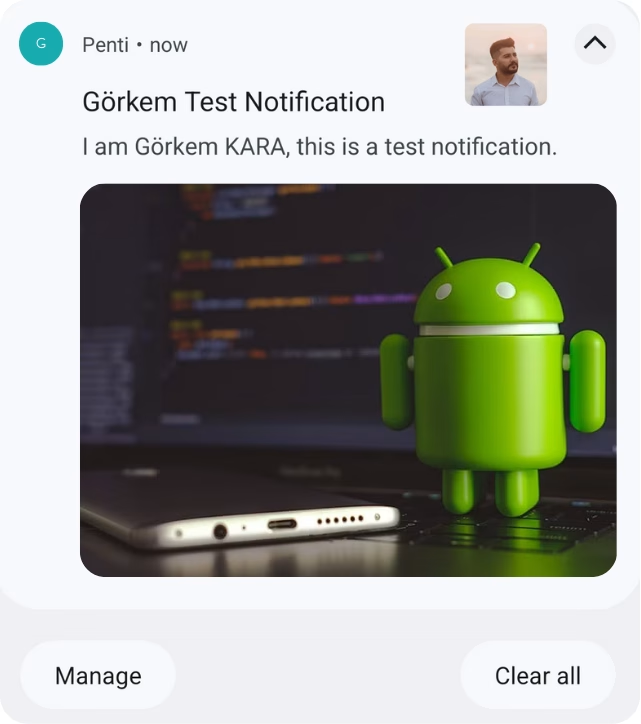
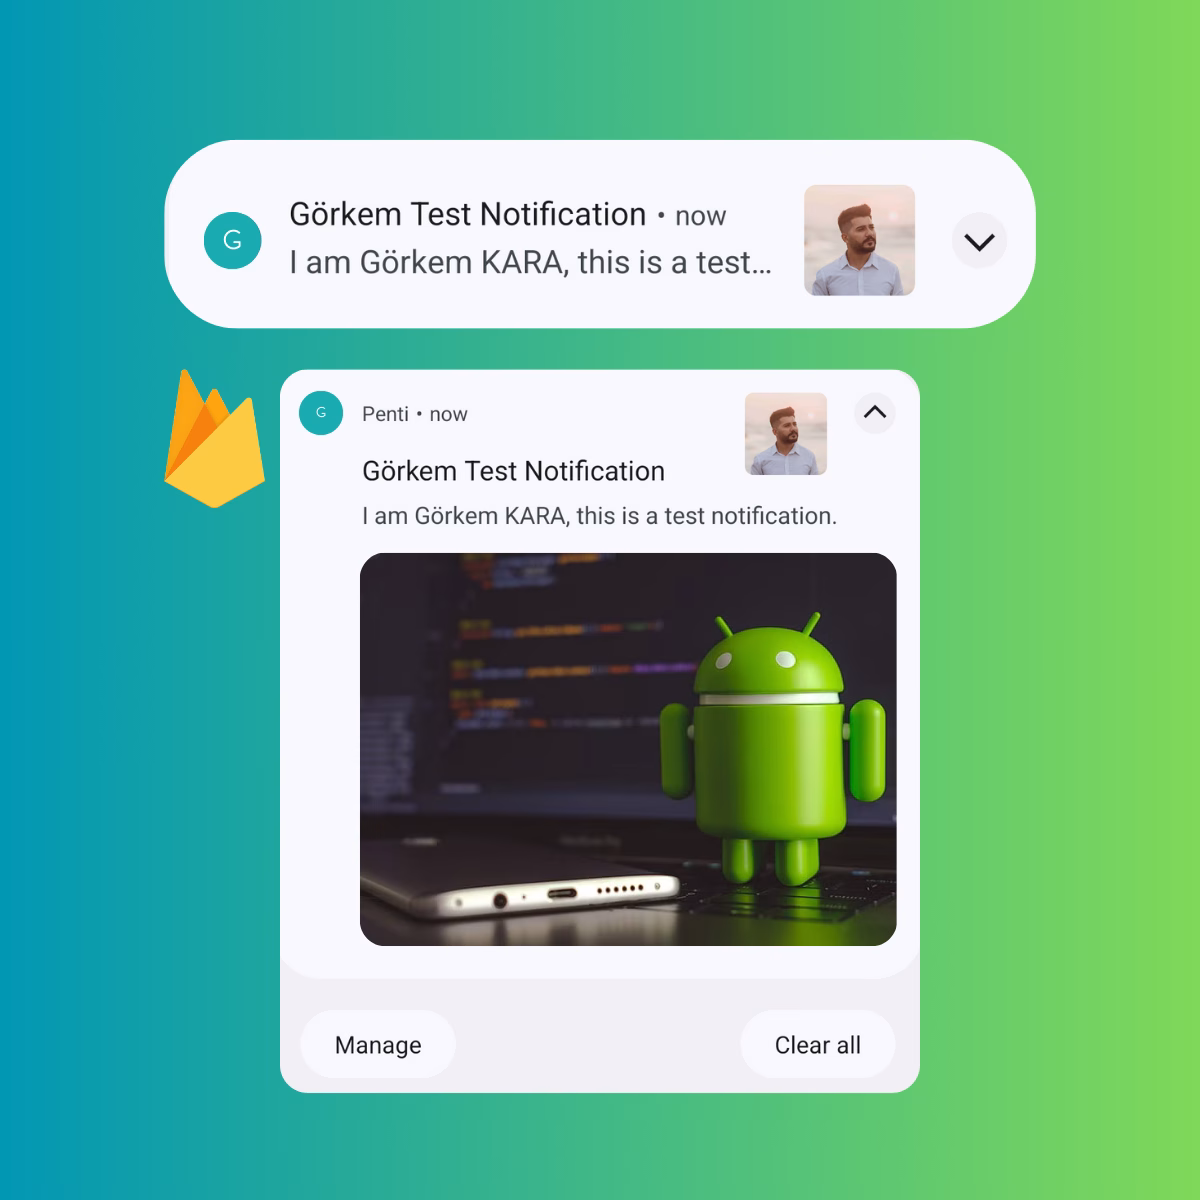
With the above code, you’ll be able to display a custom notification with all the provided information, including sound, icons, and actions.
Conclusion
This guide walked you through setting up Firebase Cloud Messaging, handling notification permissions, and creating rich notifications with Kotlin in Android. With the NotificationHelper class, you can now customize your notifications with different titles, messages, sounds, icons, and images.
Make sure to test different aspects of your notifications and adjust the logic based on your app’s needs to enhance user engagement.
Did you like this article?
You can subscribe to my newsletter below and get updates about my new articles.