Continuing from our previous guide on Creating Custom Notifications in Android with Firebase Cloud Messaging, we will delve deeper into Notification Channels—a critical component in Android for managing how notifications are grouped and displayed to users.
Introduced in Android 8.0 (API level 26), Notification Channels allow you to group notifications by type and customize their behavior, such as sound, vibration, importance level, and more. Understanding how to create, customize, and manage these channels is essential for enhancing the user experience.
What Are Notification Channels and Why Do You Need Them?
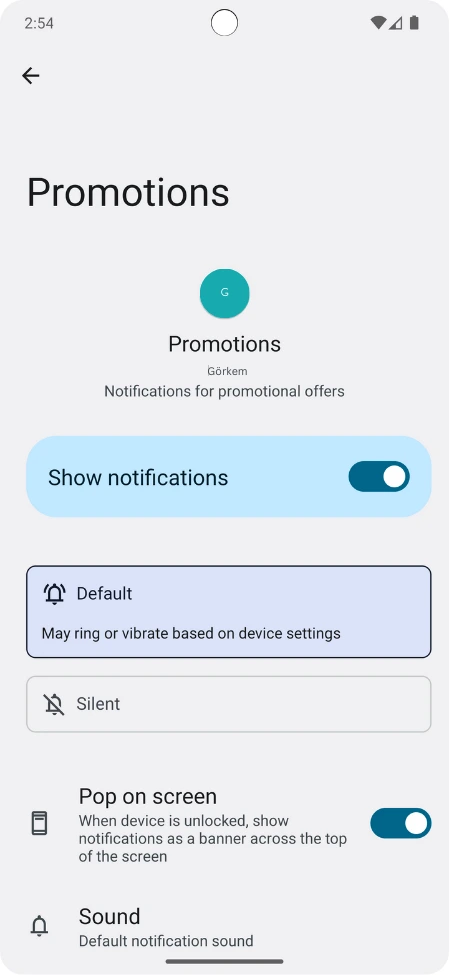
A Notification Channel is a customizable pathway for different notification types in your app. For example, a social media app might have separate channels for “Messages”, “Likes”, and “Comments”. Users can control notification settings for each channel individually, giving them the flexibility to prioritize certain notifications over others.
If your app targets Android 8.0 or higher, creating notification channels is mandatory. All notifications sent without a channel will be assigned to a default system channel with the ID “miscellaneous”.
How to Create Notification Channels in Android
To create a notification channel, you use the NotificationChannel class. Below is an example of how to create a notification channel for “Promotions” in your app:
import android.app.NotificationChannel
import android.app.NotificationManager
import android.content.Context
import android.os.Build

fun createNotificationChannel(context: Context) {
    // Check if Android version is Oreo or above
    if (Build.VERSION.SDK_INT >= Build.VERSION_CODES.O) {
        // Channel ID and name
        val channelId = "promotions_channel"
        val channelName = "Promotions"
        val channelDescription = "Notifications for promotional offers"

        // Set channel importance
        val importance = NotificationManager.IMPORTANCE_HIGH

        // Create the NotificationChannel
        val channel = NotificationChannel(channelId, channelName, importance).apply {
            description = channelDescription
            enableLights(true) // Enable lights for the notification
            lightColor = context.getColor(R.color.promotion_light_color) // Set light color
            enableVibration(true) // Enable vibration
            vibrationPattern = longArrayOf(0, 200, 100, 300) // Vibration pattern
        }

        // Register the channel with the NotificationManager
        val notificationManager = context.getSystemService(Context.NOTIFICATION_SERVICE) as NotificationManager
        notificationManager.createNotificationChannel(channel)
    }
}
Each notification channel has three essential components:
- ID: A unique identifier for the channel.
- Name: The name visible to users in their notification settings.
- Importance: Controls the level of interruption for notifications sent on this channel.
Understanding Notification Channel Importance Levels
The importance level determines the behavior of notifications, such as whether they make sound, appear on the lock screen, or simply appear silently. Here are the available importance levels:
IMPORTANCE_NONE: No sound, visual interruption, or visibility in the status bar.IMPORTANCE_MIN: No sound or visual interruption; appears only in the notification shade.IMPORTANCE_LOW: No sound; silently appears in the notification shade.IMPORTANCE_DEFAULT: Makes sound but does not visually interrupt the user.IMPORTANCE_HIGH: Makes sound and may visually interrupt the user (e.g., heads-up notification).
The appropriate importance level should be chosen based on the urgency and type of notification. For example, a message notification might use IMPORTANCE_HIGH, while a background update could use IMPORTANCE_LOW.
Organizing Notification Channels with Channel Groups
If your app has multiple related notification channels, you can group them using NotificationChannelGroup. This makes it easier for users to manage related notifications. Here’s an example of how to create a channel group:
import android.app.NotificationChannelGroup

fun createChannelGroup(context: Context) {
    if (Build.VERSION.SDK_INT >= Build.VERSION_CODES.O) {
        // Define a new group for sales and promotions
        val groupId = "offers_group"
        val groupName = "Offers & Sales"

        // Create the channel group
        val channelGroup = NotificationChannelGroup(groupId, groupName)

        // Register the group with the NotificationManager
        val notificationManager = context.getSystemService(Context.NOTIFICATION_SERVICE) as NotificationManager
        notificationManager.createNotificationChannelGroup(channelGroup)
    }
}
Once a group is created, you can assign your notification channels to it by calling setGroup() on the channel:
channel.group = "offers_group"
Finding and Deleting Notification Channels
To list, update, or delete notification channels, you can use the NotificationManager API. For example, to delete a specific notification channel:
fun deleteNotificationChannel(context: Context, channelId: String) {
    if (Build.VERSION.SDK_INT >= Build.VERSION_CODES.O) {
        val notificationManager = context.getSystemService(Context.NOTIFICATION_SERVICE) as NotificationManager
        notificationManager.deleteNotificationChannel(channelId)
    }
}
And to list all the notification channels created by your app:
fun listNotificationChannels(context: Context): List<NotificationChannel>? {
    return if (Build.VERSION.SDK_INT >= Build.VERSION_CODES.O) {
        val notificationManager = context.getSystemService(Context.NOTIFICATION_SERVICE) as NotificationManager
        notificationManager.notificationChannels
    } else {
        null
    }
}
Modifying Notification Channel Attributes
Each NotificationChannel has a set of attributes that you can customize to control its behavior. Here are some key attributes and how to modify them:
- Sound: Use
setSound(Uri, AudioAttributes)to set a custom sound for the channel. - Vibration: Use
enableVibration(boolean)andsetVibrationPattern(long[])to control vibration settings. - Importance: Use
setImportance(int)to change the priority level of the channel. - Lock Screen Visibility: Use
setLockscreenVisibility(int)to control the visibility of notifications on the lock screen. - Lights: Use
enableLights(boolean)andsetLightColor(int)to control notification LED lights.
For example, here’s how you can update a channel’s attributes:
fun updateNotificationChannel(context: Context, channelId: String) {
    if (Build.VERSION.SDK_INT >= Build.VERSION_CODES.O) {
        val notificationManager = context.getSystemService(Context.NOTIFICATION_SERVICE) as NotificationManager
        val channel = notificationManager.getNotificationChannel(channelId)

        channel?.apply {
            setSound(null, null) // Disable sound
            enableVibration(false) // Disable vibration
            setImportance(NotificationManager.IMPORTANCE_LOW) // Set to low importance
        }

        // Update the channel with the new settings
        notificationManager.createNotificationChannel(channel)
    }
}
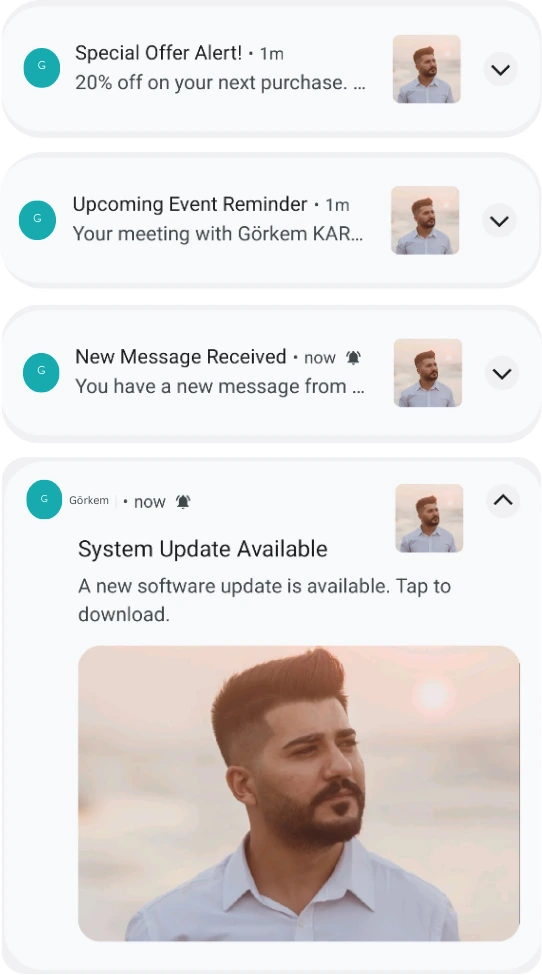
Example Notifications
Managing Default Notification Channel Settings
If a notification channel is not explicitly provided in Android 8.0+, the system uses the default channel ID "miscellaneous". To override this, you can specify your own default channel in the AndroidManifest.xml file.
Additionally, many apps use a string resource named "notification_channel" for notification channel names. If you wish to remove or rename it, simply modify or delete the string resource in the strings.xml file.
Removing “notification_channel” String Resource
<!-- strings.xml -->
<string name="notification_channel">My Notification Channel</string>
To remove it, simply delete the entry from your strings.xml file.
Conclusion
Notification channels give you granular control over how your app’s notifications are grouped and displayed. By understanding the best practices for creating channels, managing their attributes, and grouping related notifications, you can greatly enhance the user experience of your app.
For more on creating notifications in Android, don’t forget to check out our previous guide on Creating Custom Notifications in Android with FCM.
Did you like this article?
You can subscribe to my newsletter below and get updates about my new articles.