Hello Android developers! 👋 In modern Android development, handling concurrency is essential for ensuring your apps perform efficiently. Whether it’s network requests, database operations, or intensive computations, concurrency allows you to run multiple tasks simultaneously without blocking the main thread. In this article, we’ll take a deep dive into coroutines, thread management, and how to handle concurrency in Kotlin using professional practices. Let’s get started!
What is Concurrency in Kotlin?
Concurrency refers to the ability of a program to execute multiple tasks simultaneously, such as fetching data from a server while updating the user interface. With Kotlin, we can manage concurrency using lightweight threads called coroutines, which are far more efficient than traditional threads.
Why is concurrency important?
- Increased Efficiency: Running tasks concurrently allows operations to complete faster, improving the app’s performance.
- Improved User Experience: By offloading long-running tasks, you avoid blocking the main thread and keep the UI responsive.
- Resource Optimization: Using coroutines helps optimize system resources, reducing overhead compared to traditional threads.
Kotlin Coroutines: The Core of Concurrency
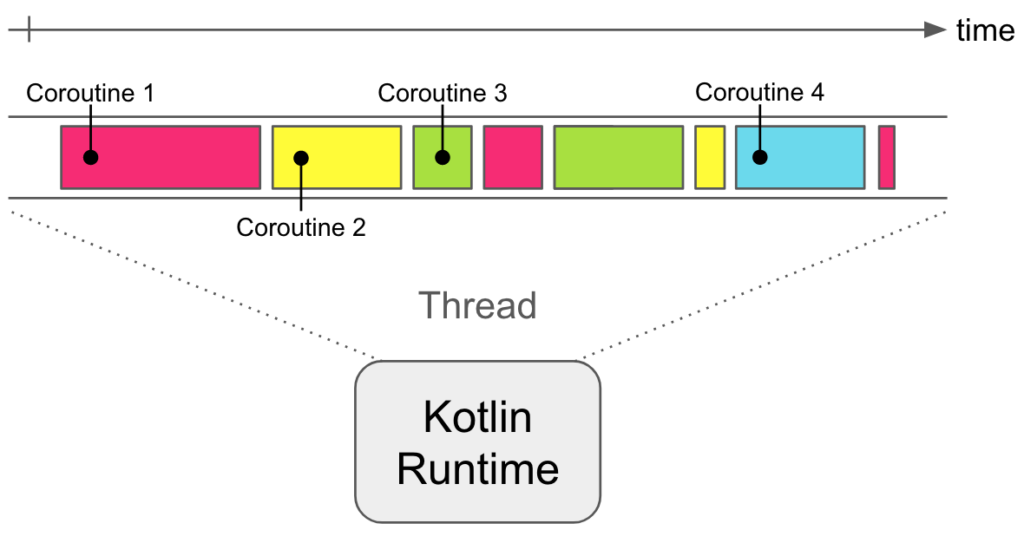
Coroutines are a Kotlin-native way to manage concurrency. They are lightweight, easy to work with, and well-integrated with Android development tools. Unlike threads, coroutines don’t occupy their own memory stack, making them much more efficient. You can launch thousands of coroutines with minimal overhead.
Setting Up Coroutines
Before using coroutines, make sure you have the correct dependencies in your project. Add the following dependency to your build.gradle file:
implementation "org.jetbrains.kotlinx:kotlinx-coroutines-core:1.6.0"Understanding Coroutine Scopes
Every coroutine needs a scope. A scope defines the lifecycle of the coroutine. There are different scopes you can use depending on where you want to run your coroutine:
- Main Scope: For running coroutines that interact with the UI. You can use
Dispatchers.Mainfor this. - IO Scope: Used for network requests or file I/O operations.
Dispatchers.IOis optimized for such tasks. - Default Scope: For CPU-intensive tasks like data processing, use
Dispatchers.Default.
import kotlinx.coroutines.*

fun main() = runBlocking {
    // Launch a coroutine on the main thread
    launch(Dispatchers.Main) {
        println("Running on the main thread")
    }

    // Launch a coroutine for I/O operations
    launch(Dispatchers.IO) {
        println("Running a network request on IO thread")
    }

    // Launch a coroutine for CPU-intensive work
    launch(Dispatchers.Default) {
        println("Running a computation on the default thread")
    }
}
Explanation: The example above shows how to use different Dispatchers to define where each coroutine will run. Dispatchers.Main is used for UI operations, while Dispatchers.IO and Dispatchers.Default are used for background tasks.
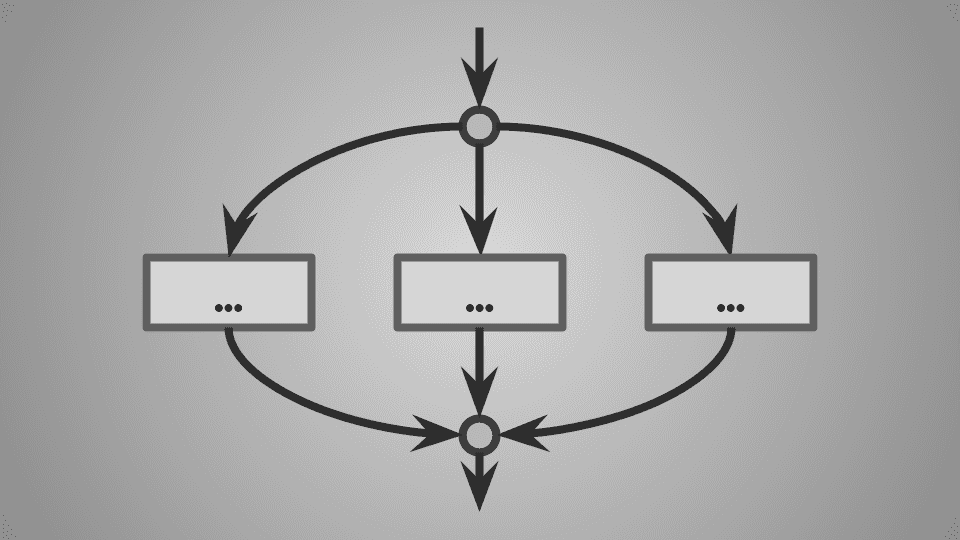
Managing Multiple Coroutines: async vs. launch
There are two main ways to launch coroutines in Kotlin: launch and async.
launch: Starts a coroutine that doesn’t return a result. It’s typically used for fire-and-forget tasks, such as updating the UI or logging data.async: Starts a coroutine that returns a result. Use this when you need to run tasks concurrently and return a value usingawait().
import kotlinx.coroutines.*

fun main() = runBlocking {
    // Launching a coroutine that performs work but doesn't return a value
    launch {
        delay(1000L)
        println("Task from launch")
    }

    // Launching a coroutine that returns a result
    val result = async {
        delay(1000L)
        "Task from async"
    }
    println("Result from async: ${result.await()}")
}
Explanation: The launch coroutine is used when you don’t need to return any value. The async coroutine, on the other hand, returns a result which you can access using await().
Handling Coroutine Cancellation
One of the powerful features of coroutines is structured concurrency, which makes managing coroutine lifecycles easier. You can cancel coroutines at any time if they are no longer needed, preventing unnecessary resource consumption.
import kotlinx.coroutines.*

fun main() = runBlocking {
    val job = launch {
        repeat(1000) { i ->
            println("Job is running: $i")
            delay(500L)
        }
    }

    delay(2000L)  // Let the job run for a while
    println("Main: Cancelling the job")
    job.cancel()  // Cancel the job
    job.join()  // Wait for the job to complete its cancellation
    println("Main: Job is cancelled")
}
Explanation: In this example, the coroutine is repeatedly printing numbers. After 2 seconds, we cancel the coroutine using job.cancel(). The job is gracefully cancelled, ensuring that it finishes any required cleanup.
Switching Between Threads in Coroutines
One of the coolest things about coroutines is their ability to switch threads easily without blocking. Using withContext, you can change the execution context to perform work on a different dispatcher.
import kotlinx.coroutines.*

fun main() = runBlocking {
    println("Running on thread: ${Thread.currentThread().name}")

    withContext(Dispatchers.IO) {
        println("Switching to IO thread: ${Thread.currentThread().name}")
    }

    println("Back to main thread: ${Thread.currentThread().name}")
}
Explanation: The withContext function switches the coroutine to the IO dispatcher for background work, and then switches back to the main thread once the work is done. This allows you to efficiently manage thread usage in a clean and readable manner.
Handling Errors in Coroutines
Error handling is crucial in concurrency, especially when dealing with multiple tasks. Kotlin coroutines offer structured error handling using try-catch blocks, ensuring that your application remains robust even if an operation fails.
import kotlinx.coroutines.*

fun main() = runBlocking {
    try {
        val result = async { fetchFromServer("https://api.example.com/data") }
        println("Data: ${result.await()}")
    } catch (e: Exception) {
        println("Error fetching data: ${e.message}")
    }
}

suspend fun fetchFromServer(url: String): String {
    delay(1000L)
    throw Exception("Failed to fetch data")  // Simulating an error
}
Explanation: Here, we use a try-catch block around the coroutine to catch any exceptions that may occur during the async operation. This ensures that if an error occurs, it can be handled gracefully.
Best Practices for Using Coroutines
- Use meaningful names: Always name your coroutines and threads meaningfully to improve readability.
- Leverage structured concurrency: Manage the lifecycle of your coroutines effectively, avoiding memory leaks.
- Handle errors properly: Always include error handling to manage failures gracefully.
- Avoid global scopes: Use
GlobalScopesparingly as it can lead to uncontrolled coroutines.
Conclusion: Mastering Concurrency in Kotlin
Kotlin coroutines offer a powerful and efficient way to handle concurrency in Android development. By using launch and async, managing coroutine scopes, handling errors, and switching threads seamlessly, you can build highly performant applications. The flexibility and lightweight nature of coroutines make them ideal for modern mobile development, and applying best practices will ensure your code remains clean, maintainable, and efficient.
If you’d like to explore a working example of concurrency in Kotlin, check out the project on my GitHub: Kotlin Concurrency Project.
Thanks for reading! 🚀 Happy coding!
Source: Kotlin Coroutines Documentation
Did you like this article?
You can subscribe to my newsletter below and get updates about my new articles.


[…] you need to handle each emitted value concurrently, you can use flatMapMerge() to introduce parallel processing to your Flow. This approach is […]
Yes, that’s right, thank you for your contribution :)