- Add the Dependency for Firebase Storage Android
- Create a Firebase Storage Reference
- Define the Upload Directory in Firebase Storage Android
- Set the File Metadata in Firebase Storage Android
- Upload the File to Firebase Storage on Android
- Monitor Upload Progress in Firebase Storage Android
- Complete Photo Upload Function for Firebase Storage Android
Firebase Storage Android integration allows you to effortlessly upload and manage files within your mobile applications. In this guide, we’ll walk you through the process of uploading files to Firebase Storage on Android and retrieving their download URLs.
Add the Dependency for Firebase Storage Android
To get started with Firebase Storage Android, you need to add the Firebase Storage dependency in your project. Open your app/build.gradle file and add the following:
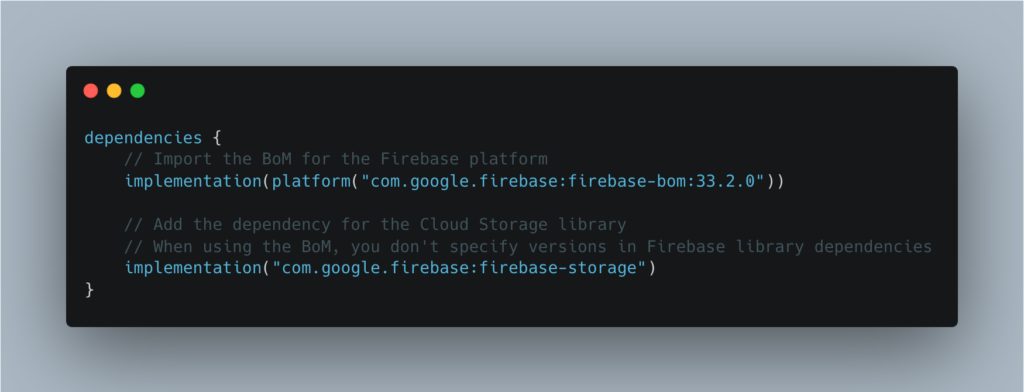
Once added, Firebase Storage will be ready for use in your app. Now, let’s move on to creating a storage reference.
Create a Firebase Storage Reference
What is a Storage Reference?
A Firebase Storage reference allows you to interact with your storage bucket. It’s the entry point for uploading, downloading, and managing files in Firebase Storage.
Creating the Reference
To create a reference to Firebase Storage, use the following code:
val storageRef = Firebase.storage.referenceDefine the Upload Directory in Firebase Storage Android
Why Define an Upload Directory?
Defining a specific directory in Firebase Storage ensures that your files are organized and easily retrievable. For instance, you may want to group user profile pictures or documents into separate folders.
How to Set the Directory
To define the directory for an image, use the following code:
val myFileRef = storageRef.child("photos/<FILE_NAME>")Set the File Metadata in Firebase Storage Android
Why is Metadata Important?
Setting metadata for a file helps Firebase understand the content type. This is essential when dealing with various file formats such as images, videos, or documents.
How to Set Metadata
Here’s how to set the metadata for a JPEG image:
val metadata = storageMetadata {
    contentType = "image/jpeg"
}
Upload the File to Firebase Storage on Android
How to Upload a File
To upload a file along with its metadata, use the following code:
val uploadTask = myFileRef.putFile(fileUri, metadata)This starts the file upload to Firebase Storage.
Monitor Upload Progress in Firebase Storage Android
Why Monitor Progress?
Monitoring the upload process provides real-time feedback to the user, ensuring they know how much of the upload is complete and if there are any issues.
How to Monitor Progress
Use the following code to track the progress, handle pauses, and detect any errors:
uploadTask.addOnProgressListener { taskSnapshot ->
    val progress = (100.0 * taskSnapshot.bytesTransferred) / taskSnapshot.totalByteCount
    d { "Upload is $progress% done" }
}.addOnPausedListener {
    d { "Upload is paused" }
}.addOnFailureListener {
    d { "failure: ${it.printStackTrace()}" }
}.addOnSuccessListener {
    myFileRef.downloadUrl.addOnSuccessListener {
        d { "downloadUrl: $it" }
    }
}
Complete Photo Upload Function for Firebase Storage Android
Now that we’ve covered the individual steps, here’s a complete function to upload a photo and retrieve its download URL upon success. If you’re new to Kotlin or want to explore more about its syntax, check out our Kotlin Programming Guide to better understand how Kotlin works in this example:
fun uploadPhoto(photoUrl: Uri, onComplete: (downloadUrl: String?) -> Unit) {
    val profilePhotosRef = storageRef.child("photos/${getPref().firebaseUuid}")
    val metadata = storageMetadata {
        contentType = "image/jpeg"
    }
    val uploadTask = profilePhotosRef.putFile(photoUrl, metadata)

    uploadTask.addOnProgressListener { taskSnapshot ->
        val progress = (100.0 * taskSnapshot.bytesTransferred) / taskSnapshot.totalByteCount
        d { "Upload is $progress% done" }
    }.addOnPausedListener {
        d { "Upload is paused" }
    }.addOnFailureListener {
        d { "failure: ${it.printStackTrace()}" }
    }.addOnSuccessListener {
        profilePhotosRef.downloadUrl.addOnSuccessListener {
            d { "downloadUrl: $it" }
            onComplete(it.toString())
        }
    }
}
Did you like this article?
You can subscribe to my newsletter below and get updates about my new articles.