Kotlin Coroutines are a game-changer for Android development, making asynchronous programming much easier and more readable. If you’re just starting with Kotlin Coroutines, this guide is designed for you! We’ll cover the basics, explain how to use coroutines in your Android apps, and provide examples to help you master this powerful tool.
What Are Kotlin Coroutines?
Coroutines are Kotlin’s way of handling asynchronous tasks. They allow you to run long-running operations, such as network requests, without blocking the main thread, which keeps your app responsive and prevents it from freezing.
Think of coroutines as lightweight threads. They help you manage tasks in the background without the overhead of traditional threading. This makes your code easier to write, read, and maintain.
Adding Coroutines to Your Android Project
Before you start using coroutines, you need to add them to your project. Here’s how to do it:
dependencies {
    implementation "org.jetbrains.kotlinx:kotlinx-coroutines-core:1.x.x"
    implementation "org.jetbrains.kotlinx:kotlinx-coroutines-android:1.x.x"
}
Make sure to replace x.x.x with the latest version from the Kotlin Coroutines GitHub page.
Understanding Coroutine Dispatchers
In Kotlin Coroutines, Dispatchers determine which thread your coroutine runs on. This is important because it allows you to choose the right thread for different tasks, making your app more efficient.
There are four main dispatchers in Kotlin:
Dispatchers.Main: This is used for tasks that interact with the UI. It runs on the main thread, which is responsible for drawing your app and handling user input.Dispatchers.IO: Use this for I/O operations like reading from or writing to a database, or making network requests. It runs on a pool of background threads optimized for these types of tasks.Dispatchers.Default: This is for CPU-intensive tasks, such as sorting large lists or performing complex calculations. It runs on a pool of threads optimized for computation.Dispatchers.Unconfined: This dispatcher starts the coroutine in the current thread but can continue in a different thread after suspension. It is generally not recommended for beginners, as it can lead to unpredictable behavior.
Example: How to Use Dispatchers in Coroutines
viewModelScope.launch(Dispatchers.IO) {
    val data = repository.fetchData()
    withContext(Dispatchers.Main) {
        updateUI(data)
    }
}
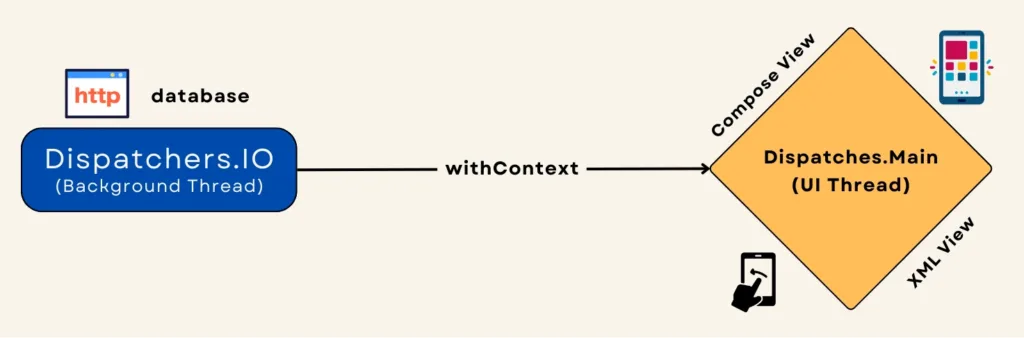
In this example, data is fetched on the IO dispatcher (background thread), and once the data is ready, the UI is updated on the Main thread to keep the app responsive.
Using Coroutines in ViewModel with viewModelScope
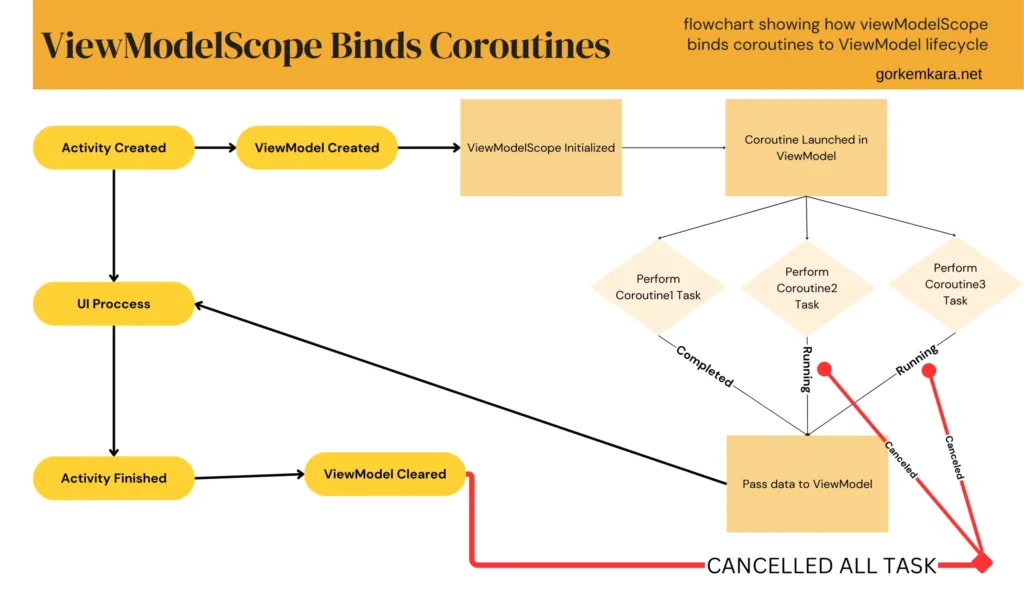
In Android, viewModelScope is commonly used to launch coroutines within the lifecycle of a ViewModel. This is important because it ensures that coroutines are automatically canceled when the ViewModel is cleared, preventing memory leaks.
Why not use GlobalScope? While you might be tempted to use GlobalScope to launch coroutines, it’s not lifecycle-aware and can cause memory leaks. Always prefer viewModelScope in ViewModels and lifecycleScope in Activities or Fragments.
Here’s an example of launching a coroutine in a ViewModel:
class MyViewModel : ViewModel() {
    fun fetchData() {
        viewModelScope.launch {
            try {
                val data = repository.getData()
                _dataState.postValue(data)
            } catch (e: Exception) {
                _errorState.postValue(e.message)
            }
        }
    }
}
By using viewModelScope, the coroutine is bound to the lifecycle of the ViewModel, ensuring that when the ViewModel is no longer needed, the coroutine is automatically canceled.
Handling Asynchronous Streams with Flow
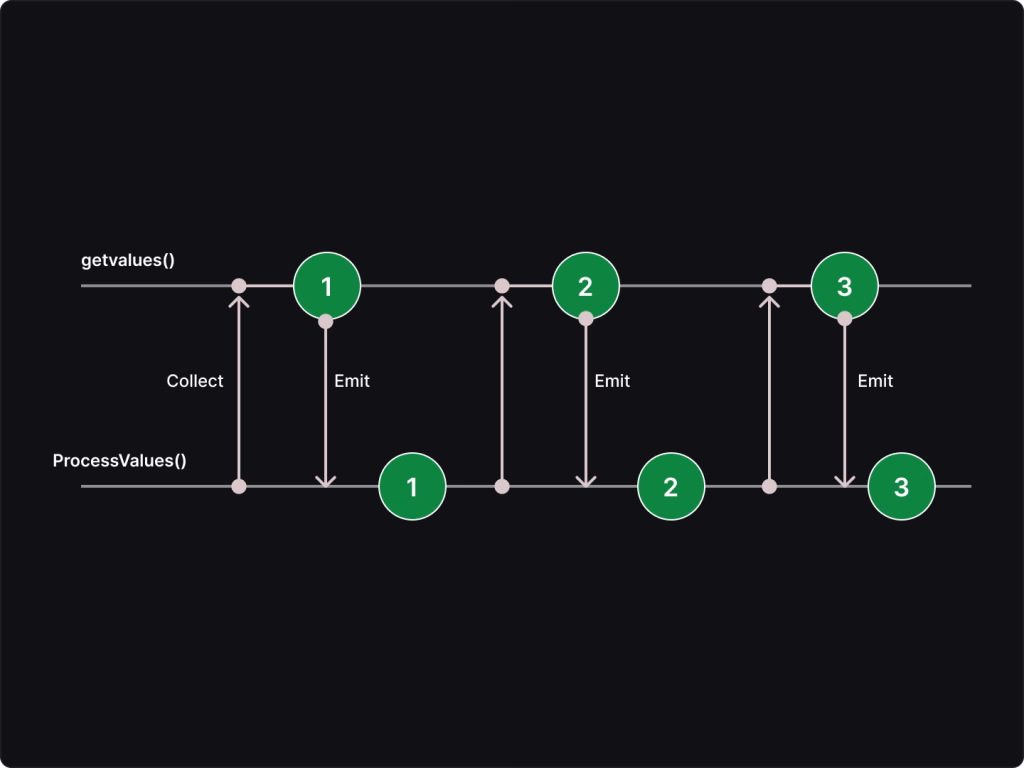
Flow is a powerful feature in Kotlin for handling streams of data asynchronously. It is similar to RxJava but easier to use and more integrated with coroutines. With Flow, you can emit multiple values over time, making it perfect for handling data that updates dynamically, such as network or database responses.
Example: Emitting Data with Flow
class UserRepository {
    fun getUserData(): Flow {
        return flow {
            val user = apiService.getUser()
            emit(user)  // Emitting user data
        }.flowOn(Dispatchers.IO)  // Runs on the IO thread
    }
}
In this example, Flow is used to emit user data fetched from an API. The flowOn operator ensures that the data-fetching happens in the background thread.
Collecting Flow in ViewModel
In your ViewModel, you can collect the emitted values from Flow and update the UI:
class MyViewModel : ViewModel() {
    val userData: LiveData = liveData {
        repository.getUserData().collect { user ->
            emit(user)
        }
    }
}
Here, we collect the Flow and emit the user data to a LiveData object that the UI can observe.
Error Handling in Coroutines with CoroutineExceptionHandler
One of the strengths of coroutines is how they handle errors. By using CoroutineExceptionHandler, you can catch uncaught exceptions and handle them gracefully without crashing your app.
Example: Handling Errors with CoroutineExceptionHandler
val exceptionHandler = CoroutineExceptionHandler { _, exception ->
    Log.e("CoroutineException", "Caught: $exception")
}

viewModelScope.launch(exceptionHandler) {
    val result = repository.fetchData()
    // Handle result here
}
Using CoroutineExceptionHandler ensures that any errors occurring inside the coroutine are caught and handled, preventing unexpected crashes.
Switching Between Threads with withContext
Coroutines allow you to switch between threads easily using withContext. This is particularly useful when you want to perform background work on a different thread (such as a network call) and update the UI on the main thread.
Example: Switching Between Threads
suspend fun fetchData() {
    val result = withContext(Dispatchers.IO) {
        apiService.getData()  // Background work
    }

    withContext(Dispatchers.Main) {
        updateUI(result)  // Updating the UI on the main thread
    }
}
In this example, the network call is done in the background using Dispatchers.IO, and once the data is fetched, the UI is updated on the main thread using Dispatchers.Main.
Best Practices for Using Coroutines
- Choose Dispatchers Wisely: Always use the appropriate dispatcher for the task. Use
Dispatchers.Mainfor UI-related tasks,Dispatchers.IOfor network/database operations, andDispatchers.Defaultfor CPU-intensive computations. - Avoid GlobalScope: Stick to lifecycle-aware scopes like
viewModelScopeorlifecycleScopeto avoid memory leaks. - Handle Errors with CoroutineExceptionHandler: Always use proper error handling to catch uncaught exceptions and prevent crashes.
Testing Coroutines with runBlockingTest
Testing coroutines can be tricky since they run asynchronously. The kotlinx-coroutines-test library provides tools like runBlockingTest to make coroutine testing easier and more reliable.
Example: Testing Coroutines with runBlockingTest
@Test
fun `test data fetch`() = runBlockingTest {
    val result = repository.fetchData()
    assertEquals(expectedData, result)
}
In this example, runBlockingTest ensures that all coroutines are executed synchronously, making the test deterministic and avoiding flakiness.
Conclusion
Kotlin Coroutines are a powerful tool for managing asynchronous operations in Android. By using the right dispatcher, lifecycle-aware scopes, and Flow for reactive streams, you can write efficient, responsive, and maintainable code. Remember to handle errors with CoroutineExceptionHandler, use withContext for switching threads, and always test your coroutines to ensure they work as expected.
Did you like this article?
You can subscribe to my newsletter below and get updates about my new articles.