Android Logcat is an essential tool for every Android developer, whether you’re just starting out or are a seasoned professional. Understanding how to use Logcat efficiently can significantly improve your debugging process, make it easier to track down issues, and help you better understand your application’s behavior. In this comprehensive guide, we’ll dive into key Logcat features, shortcuts, filters, and tips to help you navigate Logcat like a pro.
What is Android Logcat?
Logcat is a powerful logging tool built into Android Studio that displays a real-time log of messages generated by your Android device, including system messages, stack traces, and application logs. You can use it to track app crashes, network requests, background services, and user interactions.
To learn more about Android app behavior and architecture, you might want to check out this article: Understanding Mobile App Architecture.
Log Levels and Their Usage
Before diving into the Logcat’s features, let’s break down the log levels and their appropriate usage:
- Verbose: Use this level for detailed and low-priority messages. Great for debug information.
- Debug: Slightly higher priority than verbose; use for development and debugging messages that shouldn’t be shown in production.
- Info: Use this for information that highlights the progress of the app.
- Warn: Indicates potential issues or unusual situations that don’t necessarily cause an error but could lead to one.
- Error: Use this for serious issues that have caused errors in the app. These should be given special attention.
- Assert: For critical issues that should never happen in the app.
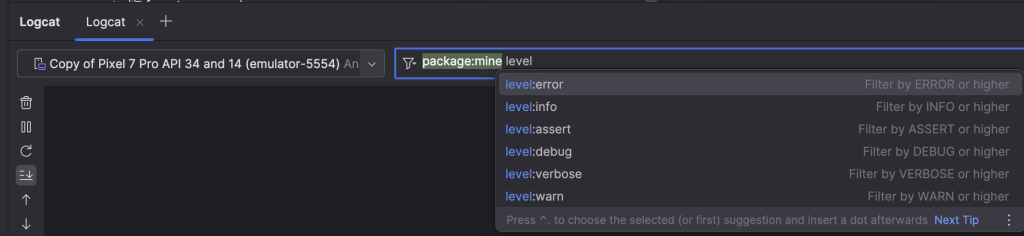
Logcat Filters: Navigating Through Logs Efficiently
Filtering logs effectively is one of the most powerful ways to use Logcat. When you’re dealing with hundreds or thousands of log entries, filters help you narrow down to what’s most relevant.
Basic Filter Parameters
- package: mine – Filters logs to only show those from your app.
- level: info – Shows logs at the specified level (can be verbose, debug, info, warn, error).
- tag~: \w+class – Use regular expressions to filter tags ending in “class”.
- -tag: Auth – Excludes logs with the tag “Auth”.
- message: User – Shows only logs containing the word “User”.
- age: 25m – Displays logs not older than 25 minutes.
- name: loginFlow – Saves the filter as “loginFlow” for future use.
By using these parameters, you can quickly isolate the logs that matter most to your current debugging session. The filter parameters can be combined for more precise filtering.
Creating Custom Logcat Filters
Android Studio provides an easy way to create custom Logcat filters, allowing you to save time and quickly access specific logs. Here’s how you can create one:
- Click on the + icon in the Logcat tab.
- Choose the parameters like Package Name, Log Level, Tag, and more.
- Give your filter a name for future use.
- Click OK to save your filter.
For instance, if you want to track the login flow of your app, you can set parameters like:
- Package: your.package.name
- Log Level: Info
- Message: login
- Name: loginFlow
Now, whenever you want to monitor the login flow, simply select the “loginFlow” filter from the dropdown menu in Logcat.
Complex Filtering Options in Logcat
For advanced debugging, Logcat supports complex filtering that allows you to combine multiple conditions. This makes it easier to isolate specific events or behaviors. Here are some useful techniques:
Combining Multiple Conditions
You can use logical operators like AND and OR to filter logs based on multiple conditions. For example:
tag: Network AND level: error
This filter will only show logs where the tag is Network and the log level is Error.
Regular Expressions (Regex) in Logcat
Using regex is a powerful way to filter tags, messages, or any other attribute in Logcat. For example:
tag~: .*Manager.*
This regex filter will match any tag that contains the word “Manager” anywhere in the tag name. Regex provides more flexibility than simple string matching and can help filter out logs based on complex patterns.
Filtering Logs by Process ID (PID)
Sometimes you may want to filter logs by a specific process running in your app. You can add the pid filter like so:
pid: 12345
This will show logs generated by the process with ID 12345. Useful when debugging multi-process apps or services.
Using Negative Filtering
If you want to exclude certain logs, you can use a negative filter. For instance:
-tag: Auth
This will exclude all logs with the tag “Auth”. Negative filtering is handy for cleaning up the log output when certain logs are unnecessary or spammy.
Filtering by Time or Duration
Another complex filtering option is to filter by time range. You can use the age filter to show logs within a specific time frame:
age: 10m
This will only display logs from the last 10 minutes, helping you focus on recent events. Alternatively, you can use the timestamp to view logs from a particular date and time.
Shortcuts for Faster Logcat Usage
Knowing some shortcuts can greatly improve your productivity while using Logcat. Here are some must-know shortcuts:
- Ctrl + L (Windows) / Cmd + L (Mac): Clears all Logcat output.
- Ctrl + F (Windows) / Cmd + F (Mac): Opens the find dialog to search through logs.
- Esc: Cancels the current search or filter.
- Ctrl + Up/Down Arrow (Windows/Mac): Scroll through the Logcat history.
These shortcuts can save you a lot of time when debugging, especially when working with long logs or multiple devices.
Tagging Your Logs Effectively
Adding tags to your logs is a best practice for making them easier to filter and understand. Each log message has a Tag and a Message. The tag is usually the name of the component or feature, and the message is the content of the log.
Log.d("NetworkManager", "Fetching user data from API")
Log.e("LoginActivity", "User login failed")
Tags help you quickly find related log messages, especially when debugging larger apps with many components.
Color Coding in Logcat
Logcat color codes different log levels for easy identification:
- Verbose: Grey
- Debug: Blue
- Info: Green
- Warn: Yellow
- Error: Red
- Assert: Purple
Use these colors to quickly identify the severity of log messages as you debug.
Advanced Logcat Features
Pin and Save Logs
If you find a log message that you need to keep track of, you can pin it. Right-click on the log and select Pin. Pinned logs stay at the top of the Logcat window for easy access.
To save logs for further analysis, right-click on the Logcat output and choose Save as File. This is particularly useful when sharing logs with team members or for logging purposes.
Logcat Regex and Message Formatting
Logcat supports regular expressions for more precise filtering. For example, to filter all logs ending with “Service”, use the expression: tag~: .*Service.
You can also customize the message format in Logcat. By default, it displays time, PID, and message content, but you can adjust this to only show relevant information.
Best Practices for Log Usage in Android Development
Here are some tips to make the most out of your logging in Android:
- Use different log levels appropriately (e.g., Debug for debugging, Error for issues).
- Avoid logging sensitive information (e.g., passwords, tokens).
- Use clear and descriptive tags for easy filtering.
- Remove unnecessary logs in production builds for performance optimization.
Conclusion
Mastering Logcat is an essential skill for every Android developer. By understanding its features, using custom filters, and implementing best practices, you can debug your applications more efficiently. Remember, effective logging is not just about outputting messages; it’s about creating meaningful logs that help you track down issues quickly.
For more information on Android debugging and best practices, you may find this article helpful: Android Operating System: The Evolution and Key Milestones for Developers.
Did you like this article?
You can subscribe to my newsletter below and get updates about my new articles.